Tenant to tenant networking with different subnet
For tenant to tenant networking I used following steps.
- Create first tenant, tenant network, tenant subnet
- Create second tenant, tenant network, tenant subnet
- Create router in admin tenant and add both tenant interface to it.
- Create 2 VMs instance into two different tenant network.
- Add security rule for PING and SSH testing.
- Ping to each other using network namespace.
To force all VMs should spin into same blade and to test tenant to tenant network into cross blade use –availability_zone=nova: extra parameter into nova boot command. We are assuming each compute host is running to separate blade. So by using –availability_zone we can achieve our goal to spin the VMs into same blade or different blades. Use same script just add one more parameter in to nova boot command.
e.g. nova boot –flavor –image –nic net-id= –availability_zone=nova: –security-group default –key-name
https://github.com/vishmule/OpenStack-Neutron-Validation-Scripts/blob/master/Tenant_Network_Test.sh
This file contains hidden or bidirectional Unicode text that may be interpreted or compiled differently than what appears below. To review, open the file in an editor that reveals hidden Unicode characters.
Learn more about bidirectional Unicode characters
| #!/bin/bash | |
| #Source the admin credentials ### | |
| source ~/keystonerc_admin | |
| #Variables definition. These variables are required for all the neutron operation. ####### | |
| first_tenant_name=tenantA | |
| first_tenant_networkname=tenantA-net | |
| first_tenant_subnetname=tenantA-subnet | |
| first_tenant_subnetaddress=10.0.0.0/24 | |
| second_tenant_name=tenantB | |
| second_tenant_networkname=tenantB-net | |
| second_tenant_subnetname=tenantB-subnet | |
| second_tenant_subnetaddress=20.0.0/24 | |
| router_name=admin-router | |
| #external_networkname=ext-net | |
| #external_subnetname=ext-subnet | |
| #external_subnet_address=192.168.122.0/24 | |
| logfile=./`hostname`.neutron_tenant_nw_validation.log | |
| line1="—————————————————————————————————————————–" | |
| line2="#############################################################################################################################" | |
| #create first tenant and tenant network with subnet ### | |
| echo $line1|tee -a $logfile;echo -e " Creating first tenant $first_tenant_name. tenant's network $first_tenant_networkname. tenant's subnet $first_tenant_subnetname\n" |tee -a $logfile; echo $line1 2>&1 |tee -a $logfile | |
| keystone tenant-create –name $first_tenant_name 2>&1 |tee -a $logfile | |
| tenant_id=`keystone tenant-list|awk '/'$first_tenant_name'/ {print $2}'` #2>&1 |tee $logfile | |
| neutron net-create –tenant-id $tenant_id $first_tenant_networkname 2>&1 |tee -a $logfile | |
| neutron subnet-create –tenant-id $tenant_id –name $first_tenant_subnetname $first_tenant_networkname $first_tenant_subnetaddress 2>&1 |tee -a $logfile;echo $line2 |tee -a $logfile | |
| #Create second tenant, tenant network with subent ### | |
| echo $line1|tee -a $logfile;echo -e " Creating second tenant $second_tenant_name. tenant's network $second_tenant_networkname. tenant's subnet $second_tenant_subnetname\n" |tee -a $logfile; echo $line1 2>&1 |tee -a $logfile | |
| keystone tenant-create –name $second_tenant_name 2>/dev/null 2>&1 |tee -a $logfile | |
| tenant_id=`keystone tenant-list|awk '/'$second_tenant_name'/ {print $2}'` #2>&1 |tee -a $logfile | |
| neutron net-create –tenant-id $tenant_id $second_tenant_networkname 2>&1 |tee -a $logfile | |
| neutron subnet-create –tenant-id $tenant_id –name $second_tenant_subnetname $second_tenant_networkname $second_tenant_subnetaddress 2>&1 |tee -a $logfile;echo $line2 |tee -a $logfile | |
| #Create router and add tenant network interface to it ### | |
| echo $line1|tee -a $logfile;echo -e " Creating router $router_name..\n" |tee -a $logfile ;echo $line1 2>&1 |tee -a $logfile | |
| neutron router-create $router_name 2>&1 |tee -a $logfile | |
| neutron router-interface-add $router_name $first_tenant_subnetname 2>&1 |tee -a $logfile | |
| neutron router-interface-add $router_name $second_tenant_subnetname 2>&1 |tee -a $logfile | |
| #neutron router-gateway-set $router_name $external_networkname 2>&1 |tee -a $logfile | |
| echo -e "\n Router with added tenant interface details" 2>&1 |tee -a $logfile | |
| neutron router-port-list $router_name 2>&1 |tee -a $logfile;echo $line2 |tee -a $logfile | |
| # Create two VM instance in respective tenant network. Change the flavor according to your requirement. ## | |
| echo $line1|tee -a $logfile;echo -e " Creating first VM instance in $first_tenant_name network..\n" |tee -a $logfile; echo $line1 2>&1 |tee -a $logfile | |
| nova keypair-add –pub-key ~/.ssh/id_rsa.pub tenant-key 2>&1 |tee -a $logfile | |
| tenant_network_id=`neutron net-list|awk '/'$first_tenant_networkname'/ {print $2}'` | |
| nova boot –flavor custom.flavor –image cirros –nic net-id=$tenant_network_id –security-group default –key-name tenant-key $first_tenant_name-vm 2>&1 |tee -a $logfile | |
| echo $line1|tee -a $logfile;echo -e "Creating second VM instance in $second_tenant_name network..\n" |tee -a $logfile;echo $line1 2>&1 |tee -a $logfile | |
| tenant_network_id=`neutron net-list|awk '/'$second_tenant_networkname'/ {print $2}'` | |
| nova boot –flavor custom.flavor –image cirros –nic net-id=$tenant_network_id –security-group default –key-name tenant-key $second_tenant_name-vm 2>&1 |tee -a $logfile;echo $line2 |tee -a $logfile | |
| echo $line1|tee -a $logfile;echo -e "Adding security rule for SSH and PING test..\n" |tee -a $logfile;echo $line1 2>&1 |tee -a $logfile | |
| # Add security group rule for ping and SSH test ### 2>&1 |tee -a $logfile | |
| nova secgroup-add-rule default tcp 22 22 0.0.0.0/0 2>&1 |tee -a $logfile | |
| nova secgroup-add-rule default icmp -1 -1 0.0.0.0/0 2>&1 |tee -a $logfile | |
| echo $line1|tee -a $logfile;echo -e "\n Waiting for 60 seconds to start SSH Daemon after the VM start….." 2>&1 |tee -a $logfile | |
| sleep 60 | |
| echo $line1|tee -a $logfile;echo -e "Testing PING from $second_tenant_name network to $first_tenant_name network..\n"|tee -a $logfile; echo $line1 2>&1 |tee -a $logfile | |
| #SSH to first tenant VM instance and ping to second tenant IP ### 2>&1 |tee -a $logfile | |
| first_tenant_internal_ip=`nova list|awk '/'$first_tenant_networkname'/ {print $12}'|cut -d= -f2` | |
| second_tenant_internal_ip=`nova list|awk '/'$second_tenant_networkname'/ {print $12}'|cut -d= -f2` | |
| echo -e "\n ip netns exec qdhcp-$tenant_network_id ssh -n -oStrictHostKeyChecking=no cirros@$second_tenant_internal_ip ping -c3 $first_tenant_internal_ip \n" 2>&1 |tee -a $logfile | |
| ip netns exec qdhcp-$tenant_network_id ssh -n -oStrictHostKeyChecking=no cirros@$second_tenant_internal_ip ping -c3 $first_tenant_internal_ip 2>&1 |tee -a $logfile | |
| tenant_network_id=`neutron net-list|awk '/'$first_tenant_networkname'/ {print $2}'` | |
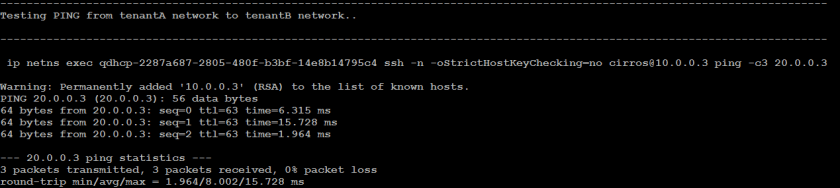
| echo $line1|tee -a $logfile;echo -e "Testing PING from $first_tenant_name network to $second_tenant_name network..\n" |tee -a $logfile; echo $line1 2>&1 |tee -a $logfile | |
| echo -e "\n ip netns exec qdhcp-$tenant_network_id ssh -n -oStrictHostKeyChecking=no cirros@$first_tenant_internal_ip ping -c3 $second_tenant_internal_ip \n" 2>&1 |tee -a $logfile | |
| ip netns exec qdhcp-$tenant_network_id ssh -n -oStrictHostKeyChecking=no cirros@$first_tenant_internal_ip ping -c3 $second_tenant_internal_ip 2>&1 |tee -a $logfile;echo $line2 |tee -a $logfile |
